This guide is for starting your TH9. It is especially important to not rush TH9 for several reasons:
- The loot penalty advances. As a new TH9 player, the majority of your loot will come from TH8 targets. You will no longer feast on easy and plentiful TH7 victims.
- Finish leveling up your TH8 troops before starting TH9. You’ll need strong troops for raiding as a new TH9 player.
- You become vulnerable to TH10 predators. As a TH8 player, TH10 raiders generally left you alone because of the loot penalty. But when you advance to TH9, you suddenly become very vulnerable to powerful and aggressive TH10 raiders. You need maximum level defenses before you leave TH8. You’ll need them for defending against TH10 predators.
Use the 10 days during TH9 construction to hoard gold and elixir. Entering TH9 with full resources is a huge advantage. Drop your trophy level to 1300-1400 and move your TH outside of the walls while you hoard resources. If you’re lucky, some trophy hunters/n00bs will snipe your TH and give you a free shield, thereby protecting your hoard of l00ts. Here is my final TH8 screenshot 16 hours remaining on the TH9 construction. Builders are ready, Gold and Elixir are maxed, and 40,000 DE saved up for the Archer Queen:

Final TH8 Screenshot
When your TH9 is ready (congratulations), here is a priority list:
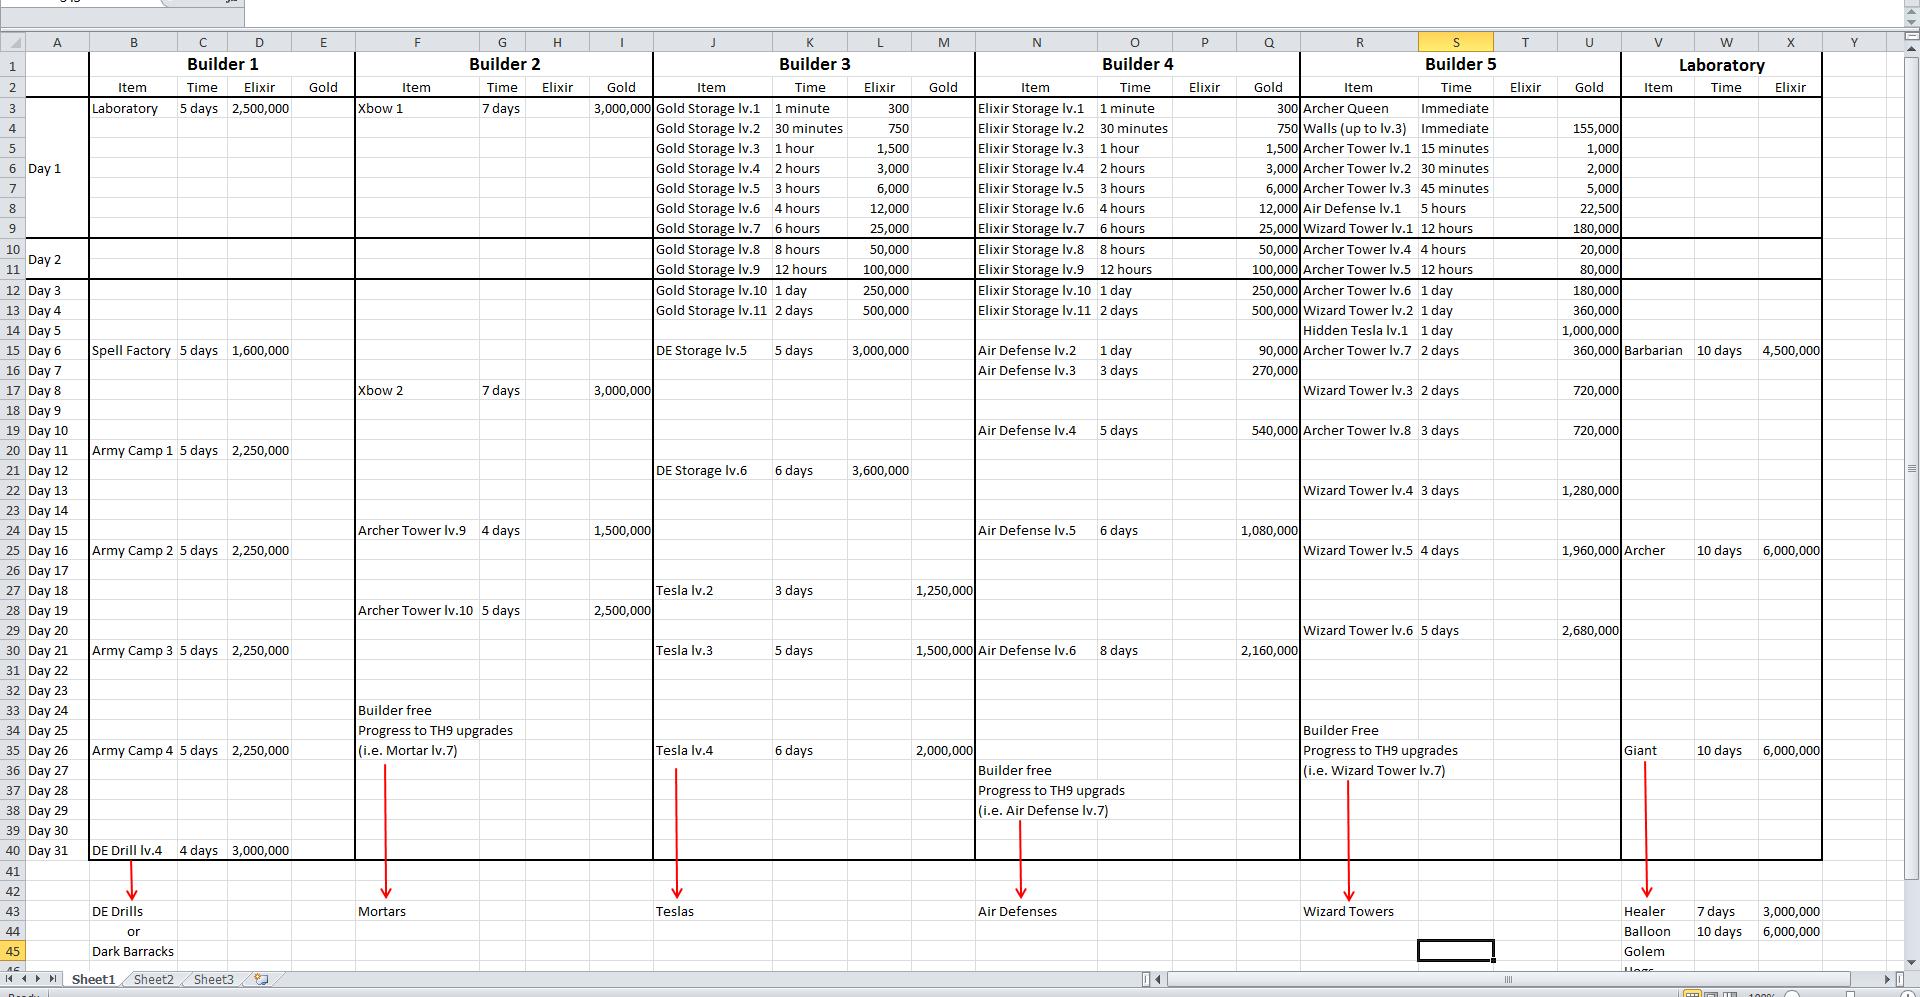
Builder 1: Upgrade Laboratory (2,500,000 elixir and 5 days) then Spell Factory (1,600,000 and 5 days). After the spell factory is completed, assign this builder to upgrade your Army Camps (2,250,000 elixir and 5 days each). This will take a total of 30 days and 13,100,000 elixir.
Builder 2: Place Archer Queen (instantaneous and 40,000 DE). Start Xbow (3,000,000 gold and 7 days) then the second Xbow. After your Xbows are finished (takes 14 days), assign this builder to help finish the four new defense towers or an Army Camp.
Builder 3: New Gold Storage to maximum level. It will take 5 solid days and 950,000 elixir to progress through all 11 upgrades. After the Storage is finished, assign the builder to upgrade the DE Storage to lv.5 (5 days and 3,000,000 elixir) and lv.6 (6 days and 3,600,000 elixir). Total of 16 days. When finished, assign this builder to help finish the new defense towers.
Builder 4: New Elixir Storage to maximum level. It will take 5 solid days and 950,000 gold to progress through all 11 upgrades. After the Storage is finished, assign the builder to help finish the new defense towers or an Army Camp.
Builder 5: New Walls, Archer Tower, Wizard Tower, Air Defense, and Hidden Tesla. Install the new 25 walls and upgrade immediately to lv.6 (instantaneous and 3,030,000 gold). Install the new Towers and Air Defense. By now, all of your new pieces are placed. Re-arrange your base layout.
Laboratory: When the laboratory is finished, immediately start the Barbarian (4,500,000 elixir and 10 days), Archer (6,000,000 elixir and 10 days), then Giants (6,000,000 elixir and 10 days). Now you are 35 days into TH9.
In-Between: Within the first few days, upgrade your walls (minimum to dark purple lv.7). As you progress, squeeze in some Spring Traps, Seeking Air Mines, Giant Bombs, and Archer Queen upgrades.
At the end of a month, you will have highly capable defensive capability and a good raiding army!
Some might question my high priority of building and upgrading the storages (Gold, Elixir, and Dark Elixir). I had strategic reasons:
- Distribute the loot – 4 Gold, 4 Elixir, and 1 DE Storage are a lot of targets. An attacker is not likely to get all 9 storages unless they 3-star your base.
- TH9 upgrades are expensive – 8,000,000 of gold and elixir is essential with expensive TH9 upgrades. Some upgrades are impossible without the additional storage capacity.
- Decrease zapper attacks – High level DE storage has more hit points, so lightening spells cause a lower percentage of damage.
- Intimidate and discourage – Fully upgraded storages look more mature and the base appears overall more intimidating, discouraging would-be attackers from going after my loot.
My base layout took into account several features, focusing on discouraging raiders and preserving loot. TH9 upgrades are expensive and require huge amounts of loot. Raiders should immediately press the “Next” button when they see my base.
- Focus on farming – the TH exposed and outside of walls without wasting any defenses for protection. That means no Hidden Teslas, bombs, or traps! If you expose your TH, don’t waste precious defenses to protect it. An exposed TH encourages trophy hunters, snipers, and n00bs to attack the TH and not go after my loot. And I get a shield. I average about 20 or 25 trophies on each one of my raids, so I don’t miss the 6 or 7 trophies subtracted when somebody snipes my TH.
- Three perimeters – an outer segmented ring of Cannons, Archer Towers, Teslas, Traps, and Bombs. The outer ring delays and thins incoming troops while the inner rings shower them with devastating splash damage. The second ring has the Air Defense, Mortars, and the loot segmented into quadrants. The inner core has the Wizard Towers, Xbows, and Archer Queen.
- Four quadrants – TH9 is great for segmented quadrant structure. Four Mortars, four Wizard Towers, four Storages, four Air Defense, four Teslas, four Seeking Air Mines, four Air Bombs, four Giant Bombs. You get the picture. Defenses and l00ts can be arranged in a symmetrical quadrant pattern, optimizing defensive interactions and wall structure to minimize loss of loot during a raid.
- Defense against Barbarian-Archer (bararch) attacks – the most common TH9 raiding style. The central core focuses on the complimentary Mortar-Wizard Tower combo for punishing splash damage. Each Wizard Towers overlooks a Mortar, a quadrant of Gold and Elixir Storage, and the other Wizard Towers. The core is further protected by two Xbows and the Archer Queen.
- Defense against Dragons or Dragon/Balloon attacks – Air Defenses are nested inside the second perimeter, making them hard to reach. They are protected by the outer ring of Cannons and Archer Towers and the inner core of Xbows and Wizard Towers. A large horde of Dragons and Balloons might get one or two of the Air Defenses, but the two remaining Air Defenses will quickly finish the job.
- Defense against Hogs. Hogs will get tied up in the outer perimeter while getting pummeled by the inner perimeter Xbows, Mortars, and splash damage. Groups of Hogs are especially vulnerable to bombs. Giant Bombs and Teslas spaced strategically around the outer perimeter will attract and demolish hordes.
- Defense against GoWiPe (Golem-Wizard-Pekka) – GoWiPe is especially good at penetrating a central core, usually achieving at least 2-star victory by destroying the Town Hall. In my base design, the TH is exposed and the loot is distributed among the quadrants. Penetrating the core may get the DE Storage but nothing else. The segmented ring structure will pull Golems and Pekkas off-course, separating the attacking army into easy-to-kill pieces.
- Defense against Wall Breakers. The walls are Lv.8 (Skulls) and no X joints! All wall joints are T-joints. This prevents a Wall Breaker from running into a corner and blowing out a junction.
So far, the only effective attack has been TH10 high-level mixed-troop Giant/Healer attacks with Lv.7 Archers and Lv.20+ royalty, and my base has never been over the 50% destruction threshold during the first few weeks!

Uhh when do you upgrade the CC?
LikeLike
Pingback: Great strategy for upgrading to TH9 | Clash of Clans: Sinister Kings League Page
picture of your th9 base?
LikeLike
plz share your th9 base layout
LikeLike
plz sare your th9 base layout
LikeLike