We are a farming clan. We emphasize aggressive looting of resources for rapid upgrading. Looting is fun work. It gives routine practice of analyzing your target’s vulnerabilities, planning an attack strategy, and learning your troop’s AI during attacks. In addition, you can level up quickly by upgrading your buildings and getting higher-level troops!
If you loot often and upgrade often, your base and troops will become stronger. You will be more valuable in war.
As a result, we are not a “trophy clan”. As long as you have enough trophies to stay in Silver League and participate in war, we are happy. If you make looting raids often, you will earn plenty of trophies. Therefore, we encourage members to leave the Town Hall exposed and lose a few trophies occasionally to attackers.
Leaving the Town Hall exposed has benefits:
- Protecting the Town Hall uses walls and weapons. The only reason to protect the Town Hall is to minimize losing trophies when an enemy attacks. Since we’re not a trophy clan, this is OK.
- You can concentrate your walls to protect your loot instead of your Town Hall.
- If your Town Hall is destroyed, you get a shield. If this happens when you are away, it prevents more attacks and loss of loot. It keeps your loot safe.
- Trophy Hunters will quickly destroy your Town Hall, take a few trophies, give you a shield, and usually won’t take your loot!
The objective is to protect your loot, so you can afford awesome upgrades!
Example 1: n00b Mistakes
This village looks OK at first, but closer inspection shows some problems. There are three exposed (unprotected) weapons – the Cannon, Archer Tower, and Air Defense are sitting out in the open. Additionally, an Elixir Storage is also exposed! The weapons inside the walls are well-protected, but with problems. Nothing is protecting the Mortar’s blind spot. The Wizard Tower is the best defense for this. In addition, the central core of the base can be accessed by breaking through a single low-level wall. He should at least put his upgraded walls to cover his weakest channels.
Example 2: Easy Looting
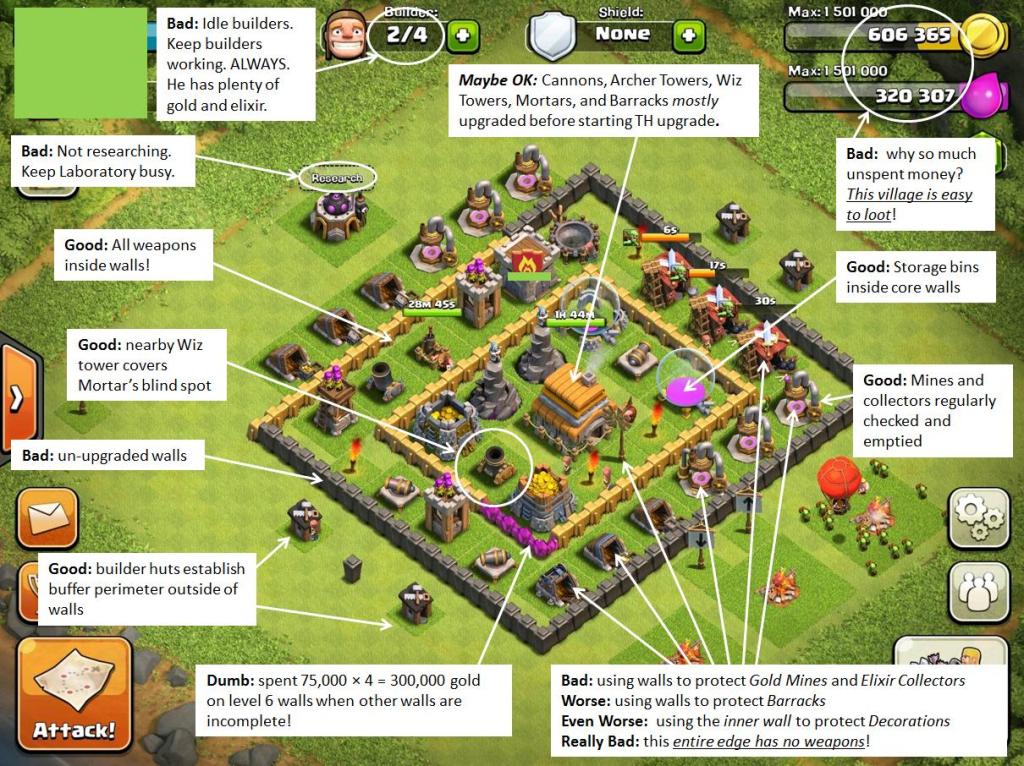
This village looks much better, but it’s not. There’s so many problems it gives me a headache. There are no defensive weapons along the entire bottom edge! All the weapons are concentrated at the top. A few giants, wall breakers, and goblins could easily penetrate the bottom perimeter and wipe out his loot.
There are two Wizard Towers above the Town Hall, but decorations below it! Are those supposed to provide defense? On the right side, there are 3 Barracks. These offer no protection! Then there is a row of purple Level 6 Walls. These cost 75,000g each. Why did the player spend 300,000g on purple walls? He could have upgraded twice as many of his grey Level 4 walls! Upgrade your lowest stuff first before spending too much gold on higher level upgrades! Aaarrrgggh!!! His expensive purple walls offer him no additional protection. It’s a terrible waste of gold that could have been used to upgrade his third Archer Tower.
Speaking of his third Archer Tower, there are few un-upgraded buildings: a Gold Storage needs upgrading, an Elixir Storage, an Archer tower, and maybe a few others. Don’t upgrade the Town Hall until other important upgrades are finished! Since his unfinished upgrades are for minor buildings, maybe it’s not too bad.
Regardless, this village is ripe for smashing. He has lots of available loot, and the entire bottom side is vulnerable to attack. It’s a no-brainer to steal this guy’s stuff. He’s practically giving it away.
Example 3: Moor’s Farming Layout
I used the Designer to create this village.
The primary weapons (in order of importance: Mortar, Air Defense, Wiz Tower) create a powerful, attack-resistant core. The wizard tower directly protects the Mortar’s blind spot. The surrounding Archer Towers and Cannons also protect the Mortar. All weapons are positioned to work together to protect each other and your loot. The long-range weapons (Cannons and Archer Towers) are individually walled to create a defensive perimeter. They can also fire inwards to protect the core. All other buildings (Barracks, Mines, Collectors, Camps, etc.) are outside the walls to create buffer zone to slow down enemy troops before they reach the walls. You can place traps around the edge.
The Town Hall is exposed, but still covered by the nearby Archer Tower and Cannon. Trophy Hunters will occasionally destroy your TH for a few trophies, but all other enemies will generally avoid this village. This layout is too tough to loot, so your attacker will look for easier targets.
Ask yourself when “Finding a Match” … would you attempt to loot this village, or keep looking for an easier target?


I like moors village. I used it and saved a lot of loot.
LikeLike