The most effective attack for mid-level players in clan wars is the All-Dragon War Attack. This strategy starts for ALL TH 7 and MOST TH8 players. In summary, you should start using the All-Dragon War Attack when you get the first Dragon Barracks in TH7. You should use the All-Dragon War Attack until you get either Level 3+ Hog Riders (mature TH8), Level 2 Golems and PEKKAs for GoWiPe attacks (TH8), or Level 6 Giants (TH9).
So, as normal, I’ll look into the gameplay algorithms and mathematics and show when the All-Dragon War Attack is best.
We have seen low-level or mid-level TH7 take out challenging TH8 bases in clan wars using the All-Dragon War Attack. Sometimes, our low TH7 bases successfully three-stars high enemy TH8 bases. We’ve all seen Kwarq, Boldt, swm, and other TH7 players handily demolish high-ranked TH8 enemy bases. The secret? The All-Dragon War Attack.
First, examine the defensive weapons. I used beginner-level TH8 weapons as the basis:
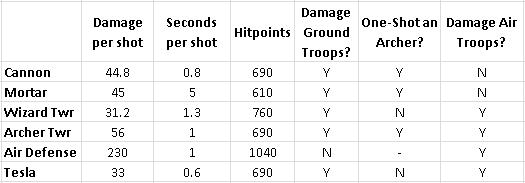
The immediate observation is standard ground troops (Barbarians and Archers) are incredibly vulnerable. The Cannon, Mortar, and Archer Tower can one-shot an archer. In the case of the Mortar, it can one-shot a whole group of archers with splash damage. The same holds true to Minions. The Wizard Tower can one-shot a whole group of airborne Minions.
Conclusion: Individual weak units (Barbarians, Archers, Minions) are NOT RECOMMENDED for war troops because splash weapons can damage multiple units simultaneously.
Conclusion: Troops with high hit points can essentially ignore splash damage weapons. It takes 70 shots from a Wizard Tower to kill a Dragon.
Conclusion: Air troops negate the threats of Cannons and Mortars.
This raises the question of why not use an all-Golem army? The answer is simple. They don’t inflict any appreciable damage. Although they may survive, they won’t wreck your target.
Hang with this. Every troop has a combination of DAMAGE and HIT POINTS. The best troop combination will have huge damage and huge hit points. Which troop has the best? I’ll remove Barbarians, Archers, Minions, and small troops from this equation, and only look at big troops that are relatively immune to splash damage. You will need to zoom in to see the spreadsheet:
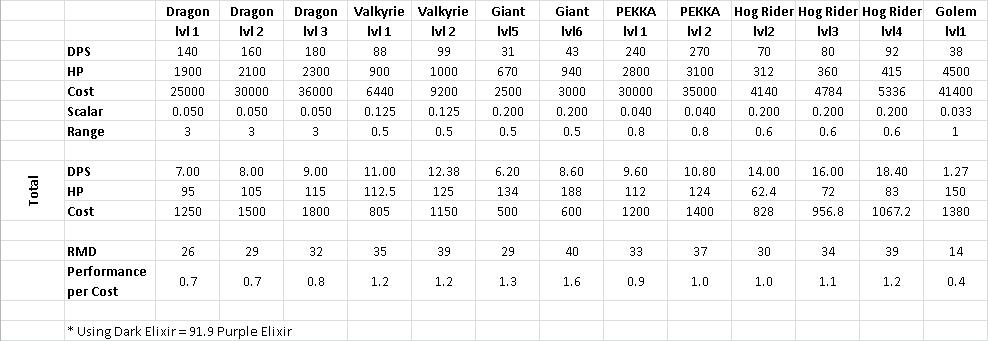
I created a metric called “Root Mean Damage” which is based on the RMS equation, but considers the DAMAGE, HIT POINTS, and HOUSING SPACE of the troop. The clear winner on this spreadsheet is the Level 6 Giant, with lots of hit points and large damage with relatively low housing space. The runner-ups are leveled-up Valkyries and Hog Riders.
Conclusion: The best DAMAGE with highest HIT POINTS with the most efficient HOUSING SPACE are leveled up troops only available to TH9 or high TH8 players.
The exception is the Level 5 Wizard, which is an awesome troop. The problem with the wizard is the absurdly low hit points (170). A few hits with any weapon will wipe him out.
So if you don’t have Level 6 Giants or Level 3 or 4 Hog Riders, what do you use?
The answer is easy: the next best thing to high-level dark troops are Dragons.
Dragons have very high hit points and avoid damage from Cannons and Mortars. The tradeoff is the Air Defense. If your strategy can take out the Air Defense, the Dragons rule the sky with air superiority. So the rest of this guide will focus on the highest-level base you can 3-star by taking out Air Defenses.
- Army composition: 10 Dragons
- Clan Castle troops: 1 Dragon
- Spells: 2 Rage and 1 Healing
What you should look for:
- 3 or less Air Defenses
- Low level Air Defenses
- Air Defenses near the edges of the base
Your first mission is to destroy the Air Defenses. The Dragon AI (Artificial Intelligence) is incredibly stupid, which defies the definition of “Artificial Intelligence”. Dragons will frustratingly fly off-course and get killed by a nearby Tesla or Archer Tower. Dragons are easily one of the most stupid troops in the game. But you can learn how to work with stupidity! You’ve learned how to live with yourself, right? We’re all experts in working with stupidity. We do it every day. Well, Dragons are stupid.
Dragons follow the course of the nearest building. If the perimeter of the base consists of a layer of mines and collectors, your Dragons will simply follow a course around the base, going from one building to the next. You need to poke a hole in the perimeter layer of buildings.
- Locate the easiest to reach Air Defense.
- Drop one Dragon and Barbarian King on the edge to destroy a few perimeter buildings. This prevents the next Dragons from being lured into attacking perimeter buildings.
- Drop a mass of Dragons (6 or 7) to penetrate into the base, destroying the first Air Defense.
- Enemy clan castle troops may emerge, but your Dragons will kill them quickly with splash damage.
- Once the first Air Defense is dead, but before your Dragons disperse, drop the healing spell so it touches as many of your Dragons as possible.
- Your Dragons will now start to disperse.
- Drop the remaining Dragons so they have the clearest shot to the base’s core. Some Dragons will get lured to perimeter buildings. Try to drop them so that doesn’t happen.
- As the Dragons approach the second and third Air Defenses, use a Rage Spell just as they approach the Air Defense. If will fail if you drop it too early.
- Sit back and watch the Dragons clean up the mess.
A lot of TH8 players don’t maximize their Air Defenses.
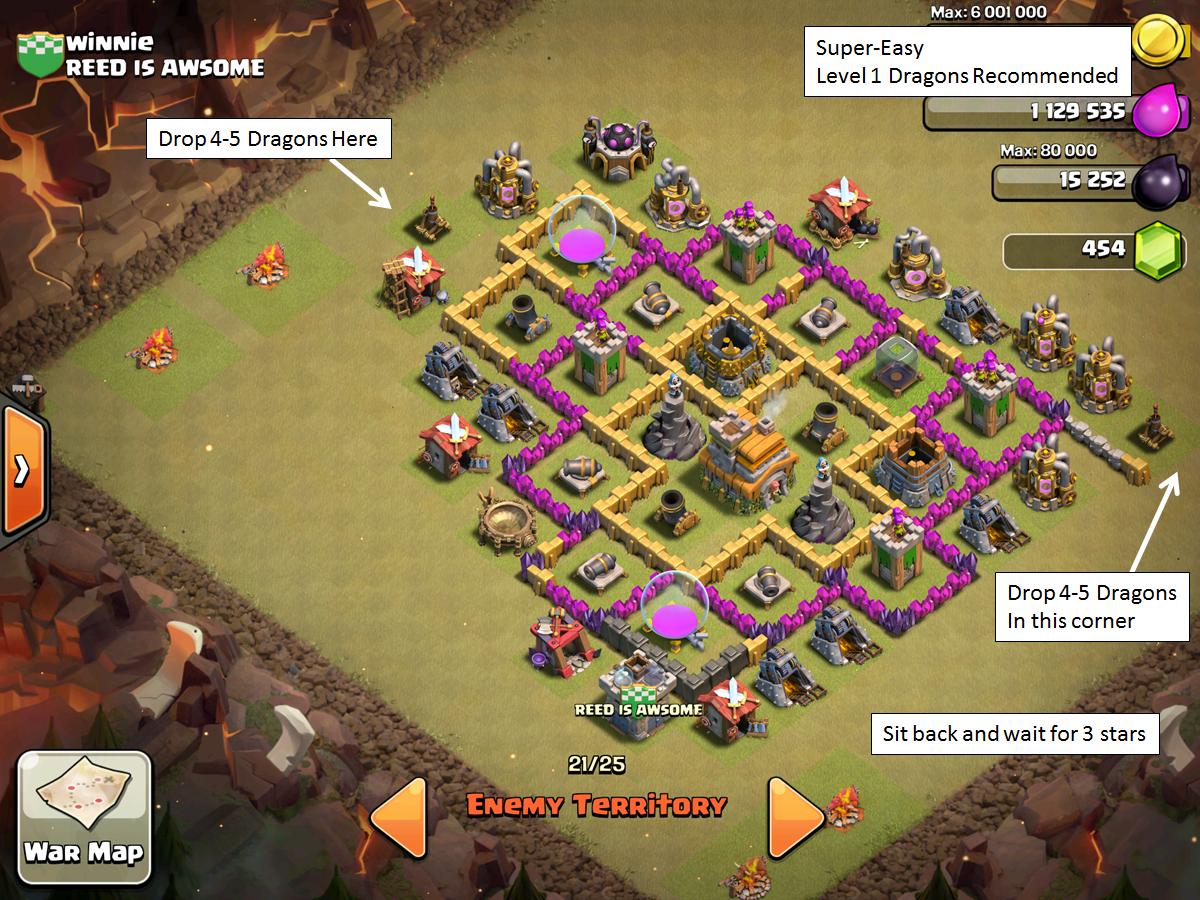
Example 1. Super-Easy
This base can be taken out easily without spells. Locate the exposed low-level Air Defenses. Drop a few Dragons on each one and watch the ensuing destruction. If you are TH7 and have Dragons, do not be tempted to use a different attack method! The All-Dragon Attack is the best chance for 3 stars. Don’t settle for less and let the clan down.
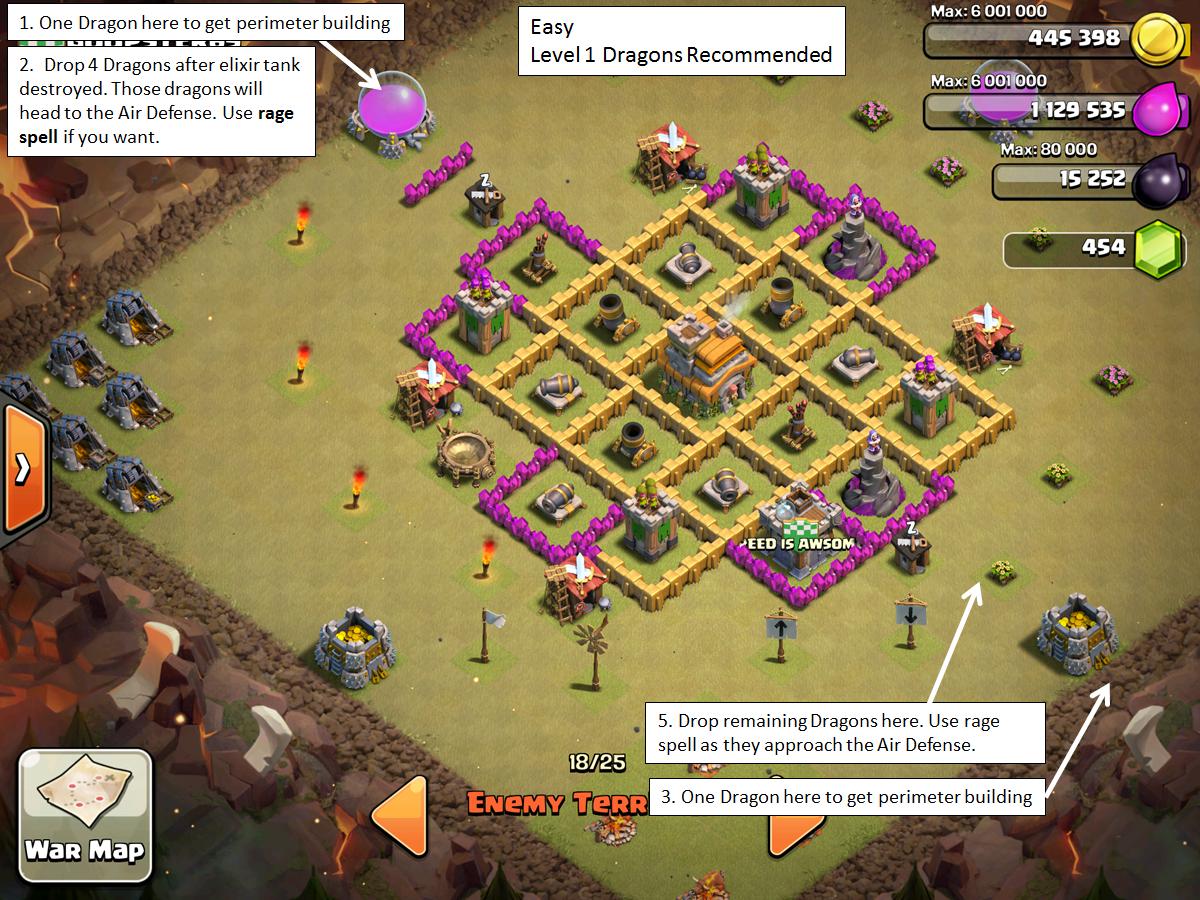
Example 2. Easy
This base has embedded Air Defenses that are harder to access. If you drop the Dragons, they will be lured by the perimeter building. Drop one Dragon to take out the perimeter building, then drop the rest together. The All-Dragon Attack is the best chance for 3 stars. Don’t settle for less and let the clan down.
Example 3. Medium Difficulty
This base had three low-level Air Defenses. Although they are low-level, they are spread apart. The best strategy is first remove the lure of the upper Army Camps. Then drop all the Dragons along the upper side. They will destory the row of Elixir Collectors and approach the first Air Defenses. Use Rage Spells (target area shown). The Dragons will disperse. As one or two Dragons approach the third Air Defense, use the final Rage Spell.

Example 4. Medium Difficulty
This base has three Level 4 Air Defenses. Minimum of Level 2 Dragons recommended. Higher is better. Drop all of the Dragons at once nearest the first Air Defense. The Dragons will kill it quickly. Use a healing spell immediately before they disperse. Use a Rage Spell as they progress to the second Air Defense. At this point, you sit and wait until 1-2 of the Dragons approach the third Air Defense. Use your final Rage Spell. If you have good luck, the Dragons will destroy it. For TH7 and most TH8 players, the All-Dragon Attack is your best chance of 3-starring this base.

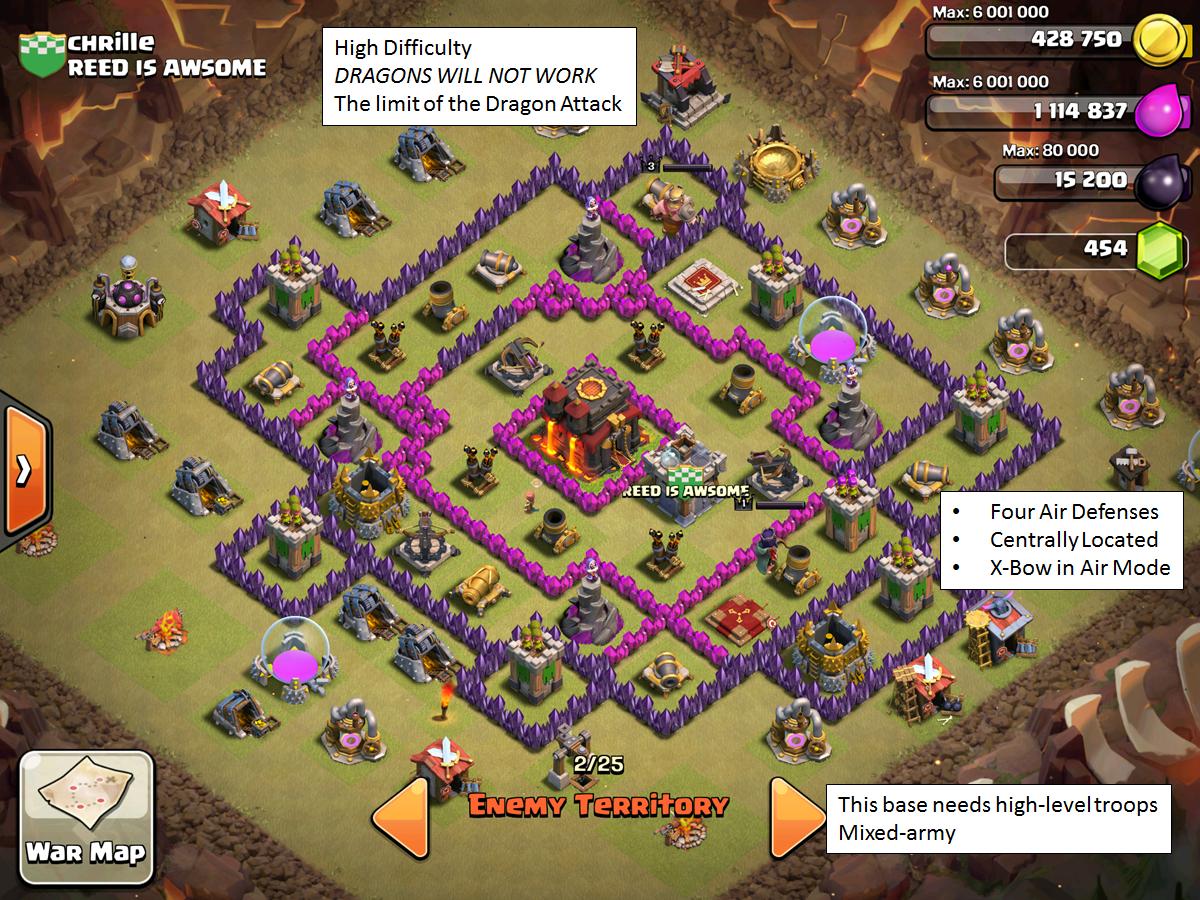
Example 5. High Difficulty
This base exceeds the ability of an All-Dragon Attack. The combination of four Air Defenses and two X-Bows set to air mode makes an air superiority attack difficult (if not impossible). This base requires higher level troops as discussed above.