Awesome Clashing

Where is the most awesome place you’ve clashed? Let’s hear it!

Post me a comment if you have an awesome clash. I will only consider posts that are G-rated and do not suggest risky behavior (i.e. while driving, interfering with safe operation, or in dangerous locations).

Clashing on the Marienbrücke overlooking Neuschwanstein Castle. And it was snowing. Really!

IMG_9351_resize


Clashing at the Delirium in Bruxelles!

IMG_9442


Listening to the noontime Glockenspiel Rathaus of Marienplatz in Munchen.

IMG_9222_edited


Even better! Individuals are encouraged to touch (more like “stroke”) Juliet’s décolletage in hopes of … well … getting some attention.

IMG_9235_size


Working on a two-stroke 90° V-4 Johnson marine engine.

IMG_9088_post


Scoping in a 308 to treat a wild pig infestation:

IMG_9078


Clashing on the Star Ferry across the Victoria Harbour (British spelling problem, not mine).

IMG_8975


Awesome! Batman Clashes!

IMG_8963


Perhaps even more awesome, Bruce Lee is a Clasher!

IMG_8962


Clashing at one of the World’s Largest Apple Stores.

IMG_8928


Rocking and Clashing!

IMG_8941


And finally, trying on a $60,000 (USD) watch while Clashing!

IMG_8999

Clan Rules

ClanMoors requires a minimum of TH7 and Level 4 Archers for membership. Leaders and co-leaders can elect to accept lower members based on loyalty and participation. Farming is encouraged, so trophy level is not strictly enforced. Focus is on player development, clan participation, and maturity. Members must have a League Shield to prove active status.

ClanMoors operates as Parliamentary Republic. Co-Leaders and Members are encouraged to voice opinions about war timing, kicks, and rule changes. The Leader has the final say.

Etiquette

  • Treat everyone as your equal. Nobody in the clan deserves more or less respect than yourself. You will be kicked if you are disrespectful or think you deserve more.
  • Chat! Part of the fun is knowing your clan members. We consist of all ages, spanning around the globe’s time zones.
  • Keep it light. Don’t insult or harass members. Sometimes humor – especially a dry wit – doesn’t always communicate over chat. If other members don’t get the joke, back off, apologize, and carry on. If things get heated, log off and take a break.
  • Agree to disagree. We have a diversity of religion, politics, and nationalities. Expect your colleagues to have different perspectives and opinions.
  • No drama! We encourage a mature dialog. Members are expected to back off from hot topics instead of escalating. Encourage and respect each other.
  • Watch the cussing. An expletive here and there is useful to emphasize a point, but don’t make it a regular thing.
  • Participate in wars. Clan wars are team sports. Not participating hurts the clan. Participating is being part of the team and contributing to everyone’s success (and War Loot)!
  • Read the Clan email. The clan email often contains important updates.
  • Listen to the Co-Leaders! Use the clan leadership to resolve differences without drama.


Troop Donations (Peacetime)

  • Try to use a lot of troops for raids and defense. Give opportunity for everyone to donate!
  • Ask for reasonable troops that everyone has: Giants, Archers, Barbarians, Wizards, Healers, Balloons, Minions.
  • Don’t ask for specific troops, like “lv.5 Wizards”. Just ask for “Wizards”. Give everyone a chance to donate.
  • You can ask for expensive Dark Troops (i.e. Hog Riders) a few times, just for experience. If you ask too many times, people will not respect you.
  • Most people have Dragons. Don’t be shy to ask! We like to donate Dragons.
  • FILL REQUESTS ACCURATLY. If someone asks for a Dragon, don’t give archers! If the person gets tired of waiting, they may change their request to something else.
  • High-level members and COs should donate more, to help the lower level players get stronger.


Troop Donations (War)

  • DO NOT put troops into War Clan Castles unless coordinated by a co-leader. War Castle donated troops don’t count toward your donation numbers on the clan member page. Don’t try to boost your donations numbers by loading people’s castles with crap!
  • War Castle troops are only provided by the clan’s highest-level players to maximize chances!
  • For war attacks, request specific troops (i.e. “Dragon” or “Level 5 Giant”). Start your request with the words “War Troops” so everyone will know. Request the troops that fit your attack strategy.
  • Fill “War Troop” requests accurately. If you don’t have the exact or higher troop being requested, don’t donate.


War Rules

War starts the end of every week on Thursday or Friday. Read the WAR RULES tab!

  • Use both attacks! You may be kicked if both attacks are not used (see “housecleaning” below).
  • If you have Dragons, use an all-Dragon attack. A co-leader will ask if you attack with weaker troops when you have Dragons.
  • Fix your WAR BASE. You may be kicked if your TH is outside of your walls.
  • Go in with a full army. You may be kicked if you attack with a partial army.
  • Use your spells. Spells can determine the outcome of your attack.
  • Start from the bottom. Let our lowest level members attack first. This gives them the best chance to pick the best bases.
  • Work upwards through the enemy bases, leaving the toughest bases for our strongest players to attack last.
  • Our top members attack last. Our strongest players go last to cleanup leftover bases and unclaimed stars.


Housecleaning

Housecleaning will be performed the Thursday after a new Trophy Season starts. You will be broomed if:

  • Your Trophy League Shield is blank. This means you are not active. If you plan to be inactive, please tell a co-leader in advance if possible.
  • You didn’t use both attacks in the previous wars.
  • Your war performance was poor. Examples are leaving the TH outside the walls, or attacking with less than a full army.
  • Your participation is weak – including chat, war, and donations.

You will be autokicked if you swear at the leader or co-leader. You will be autokicked if you are bigoted, racist, or harassing against any of our members. We encourage a healthy and mature environment where players respect our global membership across continent, country, age, religion, race, and language. Period.


Elder Status

Elder is earned by donations and participation. Elder status may be removed each season and can be re-earned the following season. Elder rank can be removed at any time if a superior rank has a reason. Elders are not allowed to kick members unless permitted by a superior rank.

The requirements for Elder are:

  • Active trophy badge
  • 100+ donations
  • Use both attacks in war


Co-Leader Status

We have a strong staff of mature and understanding leaders. Only upon exceptional circumstances will co-leader status change. DO NOT ASK FOR CO-LEADER. This is really irritating and you may be kicked.

Moor’s Strategy Guide: All-Dragon War Attacks

The most effective attack for mid-level players in clan wars is the All-Dragon War Attack. This strategy starts for ALL TH 7 and MOST TH8 players. In summary, you should start using the All-Dragon War Attack when you get the first Dragon Barracks in TH7. You should use the All-Dragon War Attack until you get either Level 3+ Hog Riders (mature TH8), Level 2 Golems and PEKKAs for GoWiPe attacks (TH8), or Level 6 Giants (TH9).

So, as normal, I’ll look into the gameplay algorithms and mathematics and show when the All-Dragon War Attack is best.

We have seen low-level or mid-level TH7 take out challenging TH8 bases in clan wars using the All-Dragon War Attack. Sometimes, our low TH7 bases successfully three-stars high enemy TH8 bases. We’ve all seen Kwarq, Boldt, swm, and other TH7 players handily demolish high-ranked TH8 enemy bases. The secret? The All-Dragon War Attack.

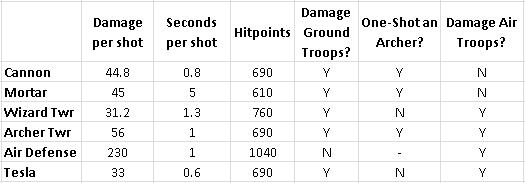
First, examine the defensive weapons. I used beginner-level TH8 weapons as the basis:
Weapons

The immediate observation is standard ground troops (Barbarians and Archers) are incredibly vulnerable. The Cannon, Mortar, and Archer Tower can one-shot an archer. In the case of the Mortar, it can one-shot a whole group of archers with splash damage. The same holds true to Minions. The Wizard Tower can one-shot a whole group of airborne Minions.

Conclusion:  Individual weak units (Barbarians, Archers, Minions) are NOT RECOMMENDED for war troops because splash weapons can damage multiple units simultaneously.

Conclusion:  Troops with high hit points can essentially ignore splash damage weapons. It takes 70 shots from a Wizard Tower to kill a Dragon.

Conclusion:  Air troops negate the threats of Cannons and Mortars.

This raises the question of why not use an all-Golem army? The answer is simple. They don’t inflict any appreciable damage. Although they may survive, they won’t wreck your target.

Hang with this. Every troop has a combination of DAMAGE and HIT POINTS. The best troop combination will have huge damage and huge hit points. Which troop has the best? I’ll remove Barbarians, Archers, Minions, and small troops from this equation, and only look at big troops that are relatively immune to splash damage. You will need to zoom in to see the spreadsheet:

Screenshot008

I created a metric called “Root Mean Damage” which is based on the RMS equation, but considers the DAMAGE, HIT POINTS, and HOUSING SPACE of the troop. The clear winner on this spreadsheet is the Level 6 Giant, with lots of hit points and large damage with relatively low housing space. The runner-ups are leveled-up Valkyries and Hog Riders.

Conclusion:  The best DAMAGE with highest HIT POINTS with the most efficient HOUSING SPACE are leveled up troops only available to TH9 or high TH8 players.

The exception is the Level 5 Wizard, which is an awesome troop. The problem with the wizard is the absurdly low hit points (170). A few hits with any weapon will wipe him out.

So if you don’t have Level 6 Giants or Level 3 or 4 Hog Riders, what do you use?

The answer is easy:  the next best thing to high-level dark troops are Dragons.

Dragons have very high hit points and avoid damage from Cannons and Mortars. The tradeoff is the Air Defense. If your strategy can take out the Air Defense, the Dragons rule the sky with air superiority. So the rest of this guide will focus on the highest-level base you can 3-star by taking out Air Defenses.

  • Army composition: 10 Dragons
  • Clan Castle troops: 1 Dragon
  • Spells: 2 Rage and 1 Healing

What you should look for:

  • 3 or less Air Defenses
  • Low level Air Defenses
  • Air Defenses near the edges of the base

Your first mission is to destroy the Air Defenses. The Dragon AI (Artificial Intelligence) is incredibly stupid, which defies the definition of “Artificial Intelligence”. Dragons will frustratingly fly off-course and get killed by a nearby Tesla or Archer Tower. Dragons are easily one of the most stupid troops in the game. But you can learn how to work with stupidity! You’ve learned how to live with yourself, right? We’re all experts in working with stupidity. We do it every day. Well, Dragons are stupid.

Dragons follow the course of the nearest building. If the perimeter of the base consists of a layer of mines and collectors, your Dragons will simply follow a course around the base, going from one building to the next. You need to poke a hole in the perimeter layer of buildings.

  1. Locate the easiest to reach Air Defense.
  2. Drop one Dragon and Barbarian King on the edge to destroy a few perimeter buildings. This prevents the next Dragons from being lured into attacking perimeter buildings.
  3. Drop a mass of Dragons (6 or 7) to penetrate into the base, destroying the first Air Defense.
  4. Enemy clan castle troops may emerge, but your Dragons will kill them quickly with splash damage.
  5. Once the first Air Defense is dead, but before your Dragons disperse, drop the healing spell so it touches as many of your Dragons as possible.
  6. Your Dragons will now start to disperse.
  7. Drop the remaining Dragons so they have the clearest shot to the base’s core. Some Dragons will get lured to perimeter buildings. Try to drop them so that doesn’t happen.
  8. As the Dragons approach the second and third Air Defenses, use a Rage Spell just as they approach the Air Defense. If will fail if you drop it too early.
  9. Sit back and watch the Dragons clean up the mess.

A lot of TH8 players don’t maximize their Air Defenses.

Example 1. Super-Easy

This base can be taken out easily without spells. Locate the exposed low-level Air Defenses. Drop a few Dragons on each one and watch the ensuing destruction. If you are TH7 and have Dragons, do not be tempted to use a different attack method! The All-Dragon Attack is the best chance for 3 stars. Don’t settle for less and let the clan down.

Screenshot002

Example 2.  Easy

This base has embedded Air Defenses that are harder to access. If you drop the Dragons, they will be lured by the perimeter building. Drop one Dragon to take out the perimeter building, then drop the rest together. The All-Dragon Attack is the best chance for 3 stars. Don’t settle for less and let the clan down.

Screenshot003

Example 3. Medium Difficulty

This base had three low-level Air Defenses. Although they are low-level, they are spread apart. The best strategy is first remove the lure of the upper Army Camps. Then drop all the Dragons along the upper side. They will destory the row of Elixir Collectors and approach the first Air Defenses. Use Rage Spells (target area shown). The Dragons will disperse. As one or two Dragons approach the third Air Defense, use the final Rage Spell.

Screenshot004

Example 4. Medium Difficulty

This base has three Level 4 Air Defenses. Minimum of Level 2 Dragons recommended. Higher is better. Drop all of the Dragons at once nearest the first Air Defense. The Dragons will kill it quickly. Use a healing spell immediately before they disperse. Use a Rage Spell as they progress to the second Air Defense. At this point, you sit and wait until 1-2 of the Dragons approach the third Air Defense. Use your final Rage Spell. If you have good luck, the Dragons will destroy it. For TH7 and most TH8 players, the All-Dragon Attack is your best chance of 3-starring this base.

Screenshot005

Example 5. High Difficulty

This base exceeds the ability of an All-Dragon Attack. The combination of four Air Defenses and two X-Bows set to air mode makes an air superiority attack difficult (if not impossible). This base requires higher level troops as discussed above.

Screenshot006

Moor’s Strategy Guide: TH5 Farming Base

We are a farming clan. We emphasize aggressive looting of resources for rapid upgrading. Looting is fun work. It gives routine practice of analyzing your target’s vulnerabilities, planning an attack strategy, and learning your troop’s AI during attacks. In addition, you can level up quickly by upgrading your buildings and getting higher-level troops!

If you loot often and upgrade often, your base and troops will become stronger. You will be more valuable in war.

As a result, we are not a “trophy clan”. As long as you have enough trophies to stay in Silver League and participate in war, we are happy. If you make looting raids often, you will earn plenty of trophies. Therefore, we encourage members to leave the Town Hall exposed and lose a few trophies occasionally to attackers.

Leaving the Town Hall exposed has benefits:

  • Protecting the Town Hall uses walls and weapons. The only reason to protect the Town Hall is to minimize losing trophies when an enemy attacks. Since we’re not a trophy clan, this is OK.
  • You can concentrate your walls to protect your loot instead of your Town Hall.
  • If your Town Hall is destroyed, you get a shield. If this happens when you are away, it prevents more attacks and loss of loot. It keeps your loot safe.
  • Trophy Hunters will quickly destroy your Town Hall, take a few trophies, give you a shield, and usually won’t take your loot!

The objective is to protect your loot, so you can afford awesome upgrades!


Example 1:  n00b Mistakes

SDi504 20140808 145209

This village looks OK at first, but closer inspection shows some problems. There are three exposed (unprotected) weapons – the Cannon, Archer Tower, and Air Defense are sitting out in the open. Additionally, an Elixir Storage is also exposed! The weapons inside the walls are well-protected, but with problems. Nothing is protecting the Mortar’s blind spot. The Wizard Tower is the best defense for this. In addition, the central core of the base can be accessed by breaking through a single low-level wall. He should at least put his upgraded walls to cover his weakest channels.


Example 2:  Easy Looting

SDi503 20140808 145156

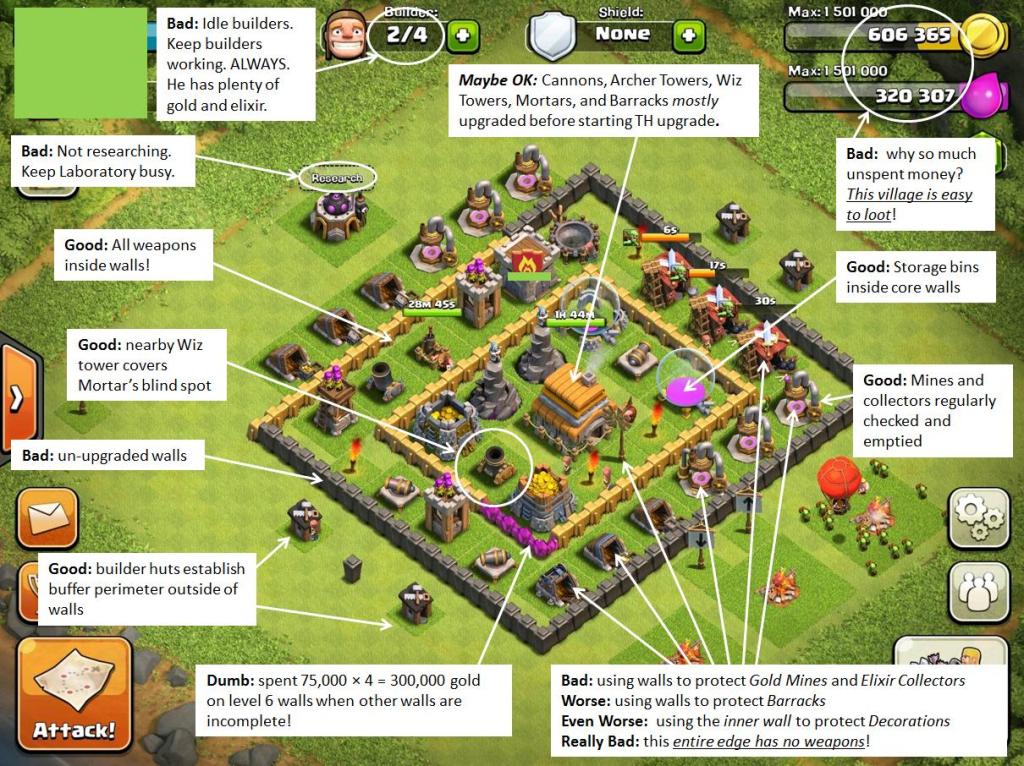
This village looks much better, but it’s not. There’s so many problems it gives me a headache. There are no defensive weapons along the entire bottom edge! All the weapons are concentrated at the top. A few giants, wall breakers, and goblins could easily penetrate the bottom perimeter and wipe out his loot.

There are two Wizard Towers above the Town Hall, but decorations below it! Are those supposed to provide defense? On the right side, there are 3 Barracks. These offer no protection! Then there is a row of purple Level 6 Walls. These cost 75,000g each. Why did the player spend 300,000g on purple walls?  He could have upgraded twice as many of his grey Level 4 walls! Upgrade your lowest stuff first before spending too much gold on higher level upgrades! Aaarrrgggh!!! His expensive purple walls offer him no additional protection. It’s a terrible waste of gold that could have been used to upgrade his third Archer Tower.

Speaking of his third Archer Tower, there are few un-upgraded buildings:  a Gold Storage needs upgrading, an Elixir Storage, an Archer tower, and maybe a few others. Don’t upgrade the Town Hall until other important upgrades are finished! Since his unfinished upgrades are for minor buildings, maybe it’s not too bad.

Regardless, this village is ripe for smashing. He has lots of available loot, and the entire bottom side is vulnerable to attack. It’s a no-brainer to steal this guy’s stuff. He’s practically giving it away.


Example 3:  Moor’s Farming Layout

I used the Designer to create this village.

SDi502 20140808 144956

The primary weapons (in order of importance: Mortar, Air Defense, Wiz Tower) create a powerful, attack-resistant core. The wizard tower directly protects the Mortar’s blind spot. The surrounding Archer Towers and Cannons also protect the Mortar. All weapons are positioned to work together to protect each other and your loot. The long-range weapons (Cannons and Archer Towers) are individually walled to create a defensive perimeter. They can also fire inwards to protect the core. All other buildings (Barracks, Mines, Collectors, Camps, etc.) are outside the walls to create buffer zone to slow down enemy troops before they reach the walls. You can place traps around the edge.

The Town Hall is exposed, but still covered by the nearby Archer Tower and Cannon. Trophy Hunters will occasionally destroy your TH for a few trophies, but all other enemies will generally avoid this village. This layout is too tough to loot, so your attacker will look for easier targets.

Ask yourself when “Finding a Match” … would you attempt to loot this village, or keep looking for an easier target?